 GEEK’N
WITH ED GEEK’N
WITH ED
Network
Attached Storage
A
2 Terabyte Buffalo Terastation NAS For Your Edit Station
By Ed Sharpe - Glendale Daily
Planet (www.glendaledailyplanet.com)
or…
A Storage Space Dilemma Solved!
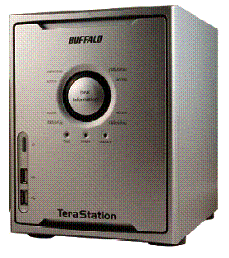
Even though I had close to 1
terabytes online with my Sony Vaio we have as an edit station, I found
myself with only 56 gigabytes of storage left on the system. What I needed
was a quick increase in storage! Even though I had other computers used
for video editing, audio processing etc… I noticed there were many stock
items being stored on each system that were handy to have online, but not
really necessary to have on each system if we could keep them out on some
slower storage on the network. Additional storage was also needed for
backup of projects
 I
also wanted a solution that did not require a lot of time to set up as
there were many tape conversion projects we were involved in regarding the
production we were assisting with concerning Daniel and Phillip Berrigan
and their anti-war activities, release from jail and “die-ins
at” the senate. With DVCAM tapes at over 12 gigabytes each piling up
from all the decaying ˝ inch reel to reel video tape originally shot on
an AV-3400 Sony Port-a-Pac. I
also wanted a solution that did not require a lot of time to set up as
there were many tape conversion projects we were involved in regarding the
production we were assisting with concerning Daniel and Phillip Berrigan
and their anti-war activities, release from jail and “die-ins
at” the senate. With DVCAM tapes at over 12 gigabytes each piling up
from all the decaying ˝ inch reel to reel video tape originally shot on
an AV-3400 Sony Port-a-Pac.
Normally what I would have done
is to build a bare bones system with a large number of drives and hang it
on the network…. But no time to build system and certainly no time to
format 4 separate 500-gigabyte disk drives! I needed a solution and I
needed it NOW!
The way to have a central
shared resource, fairly fast, and lots of it is to use NETWORK ATTACHED
STORAGE devices. Out of the box, pre formatted, and taking only minutes to
set up this was indeed the winning solution!
There are numerous companies
making Network Attached Storage, however, I chose the Buffalo Terastation as
I had experience with the reliability of many of their wireless products
and smaller disk solutions. Another deciding factor was the price of just
over $1000. This unit will work on networks containing PC’s, Apple
Mac’s or Linux workstations, however, in this instance the information
we are going toi relate in this test report is based using a PC.
The setup was a breeze… It
consisted of…
-Unpacking the unit
-Glancing at the manual for
less than a minute (You may want to spend more time)
-Plugged the unit into the
network switch (you may have a hub..,)
-Plugged the unit into power.
-Placed
the TeraNavigator CD
into the Computer’ CD drive.
-Set up a good secret password
and user name.
-
-Yea! Start transferring files
from other computers to the Terastation NAS device
I probably spent most of the
time throughout this entire process wondering why it was so fast and where
was the difficult part …
After having everything set up
I decided to call technical support and ask a bunch of questions.
I found the customer support process at Buffalo to be quick and
extremely knowledgeable. Indeed, the people I talked with were very
patient as I droned on with a collection of simple and in-depth questions
on system internals, network theory, applications, and product evolution.
I give them an A+.
There are other bonus features
of this unit. One additional
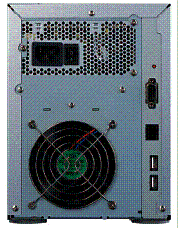
feature is the ability to have other external USB drives hooked to the
Terastation. In this manner you can everyone on the network transfer data
to this removable USB drive, detach the drive and carry it to another
building, down the street or to take with you on a long airplane flight!
The
Teraserver will also act as a print server allowing others on a network to
all share a non network printer with just a USB port on it. This feature
allows you to purchase very inexpensive printers and run them easily as
shared network devices.
With the Memeo™
AutoBackup software you may set up scheduled backup routines.
But
Wait… THERE IS MORE! TeraStation
can also be used a Multimedia Server for direct streaming of digital media
to your TV or HDTV in almost any audio, video or graphic format.
Compatibility with Buffalo’s LinkTheater Network Media Player offers
wireless streaming of all your music, videos, images - all directly to
your TV.
A Few More Technical Specifications
and Raid Info… :
Wired
LAN Interface Transmission
Rate 10/100/1000 Mbps
Transmission
Distance 328 ft.
This
unit is a trim… 6.6
x 8.7 x 9.5 inches and if you have a pair of them they stack nicely!. For
such a small unit the weight is a surprising dense 15.8 lbs.
Here
are the possible configurations of the internal disk drives in the
Terastation unit. We are only
concerned with the HD-H2.0TGL/R5
2 Gigabyte array.
When
all these disk drives are configured in a raid 5 array you get 1.5
terabytes total of storage. This is, less storage than the full spanning
mode of 2 Terabytes, but it offers protection so if one disk fails you
still have integrity of data. To recover completely a new disk drive
replaces the failed unit in the Terastation and the system will rebuild
the missing data for the failed disc drive.

TeraStation
uses RAID
(“Redundant
Array of Independent Disks”) technology to control the four
hard
drives in your TeraStation. RAID may be configured several ways:
RAID
Spanning
-
All four drives are striped into one large drive, giving the maximum
capacity for
your
TeraStation. This size is the one listed on your TeraStation’s box and
shows the total capacity
of
the TeraStation with no data used for redundancy. RAID Spanning is fast
and efficient, but with
no
redundancy, if one hard drive fails, all data on the TeraStation is lost.
RAID
1
(mirroring)
- Hard drives (or spanned pairs of hard drives) are arranged in mirrored
pairs.
Each
half of the pair reads and writes exactly the same data. This costs you
half the total capacity
of
your TeraStation, but provides excellent redundancy. If a hard drive
fails, the mirror continues
to
supply data, so you may work on normally. You may replace the damaged or
defective drive at
any
time, and normal RAID 1 mirroring will then be automatically restored.
RAID
5
(parity)
- All drives in a RAID 5 array reserve part of their data space for parity
information,
allowing
all data to be recovered if a single drive fails. The parity information
takes up about one
hard
drive’s worth of space, so if you set up all four drives in the
TeraStation as a RAID 5 array,
your
usable capacity will be about 3/4 of the total capacity of the TeraStation.
RAID 5 is an
excellent
compromise between efficiency and security. If a single drive fails, no
data is lost. After
the
damaged or defective drive is replaced, your TeraStation will
automatically restore all data to
the
new drive and resume normal RAID 5 operation. This is how your TeraStation
is set up out
of
the box.
Buffalo Technology recommends RAID 5
for
its excellent balance of efficiency and security.
A full specifications package
on this unit can be found at:
http://www.buffalotech.com/downloads/TeraStation-DSnew.pdf
The user manual for this unit
may be found at:
http://www.buffalotech.com/downloads/TeraStation_Manual_Web.pdf
World-wide general web site for
Buffalo at:
http://www.buffalo-technology.com/
SUMMARY:
5-in-1: File, Print, Backup, FTP and Multimedia Server in One!
Combining advanced fault tolerant
data solutions, robust file security and Gigabit
Ethernet networking, TeraStation
allows users to deploy a simple, cost-effective data or
media server to their office or
home network in literally minutes without cutting corners
on features or expandability. By
offering a total of four USB 2.0 ports, the device can
accommodate additional external USB
hard drives for expanded networked storage
or as backup targets. Additionally,
a USB printer that can be attached and shared over
the
network via TeraStation’s built-in Print Server.
|

|
'Quick
and curious and
in the know...
it's KKAT-TV'
|
video camera hints for web journalism
We have a wide assortment of video gear we use,
HDV, Betacam DV.
For quick "grab n' go camera we use some of the small cannon GS-35
video cameras. Main thing I liked about them is they HAVE EXTERNAL
MICROPHONE INPUTS!
Really important if you are out on location and wish to pump external
audio in.
Also better as you can clip lav mike on your subject..... also good as
you can use a shotgun mike....but the visual...
Ya gotta be able to have a mike with a flag on it! Lets face it ..
nothing cues the subject to speak as well s the mike being flipped
towards them.
The little GS-35's cost us $250 on closeout and shoot DV tape..... I
load the tape to the edit by and then just shelve the source tape in
case I need it for later use.
Another nice thing to do with these... and although I many times I go on
an assignment by myself..... you can set up 2 or three of these little
guys and let them run and multi-cam edit in your NLE.... I have become
the states poster child for the one man new media shoot....
Another plus of this small DV camera is the act you can purchase low
priced telephoto and wide-angle attachment kits for them... We bought
some of the 40 dollar variety at fry's and since the little cameras
already had a 30 x optical zoom we set the tele-extender in the drawer
and use the wide angle adapter. This adapter is a MUST when you are
working in really close areas... beware though it will give your subject
-horsey face if you have the lens too close to their face during an
interview.
the adapters we use seem to 'zoom though' just fine
OK my parting comment on the tape cam vs the disc cam... yea both have
an advantage but here is my rationale...
If you shoot video you have a source and an archive
With disc camera... you have to archive it off to another disc drive...
expensive
With a tape camera you archive it on a 3 dollar tape ( or $12 if you
like the really good Sony master tapes) Yea... it takes time to load the
tape to the edit bay but... when I come into the office after a shoot I
usually like to stuff my face... chug 1/4 pot of coffee etc... so not
really time lost..
The tapes stack up well and are cheap compared to stacking up disc
drives and tapes sure last longer when you drop them than the disc
drives!
One added note... I believe the tape cameras stand up better than the
disc cameras when dropped also!
Feel free to contact me if you have any other questions!
Ed Sharpe
www.glendaledailyplanet.com
Ed Sharpe, Archivist for SMECC
See the Museum's Web Site at www.smecc.org
 (alt+p)
|
 (alt+p)


























 I
also wanted a solution that did not require a lot of time to set up as
there were many tape conversion projects we were involved in regarding the
production we were assisting with concerning Daniel and Phillip Berrigan
